Hello 3D World! The Complete Guide to Creating Blender Add-ons
What are Blender Add-ons?
Add-ons are additional scripts that extend Blender’s functionality. Blender ships with a lot of predefined toolsets in officially supported add-ons written by their development team. However, they don’t limit you to just the ones they ship in the source code. I’m going to teach you how to create a Blender add-on.
The Blender team not only allows developers to write their own add-ons, they encourage it!
If you have ever used the Node Wrangler, you have used an add-on.
Where can I find Blender Add-ons?
To get to Blender’s own officially written add-ons written by the development team and community-supported add-ons the team has incorporated into the distribution, go to Edit -> Preferences -> Add-ons.
If you want something else, entire ecosystems have sprung up to support the Blender community. Many independent markets provide these and other assets, but Blender Market has proven to be one of the most reliable. You can get them from anywhere you trust.
I Didn’t Find an Add-On That Met My Use Case
So you searched the links above and consulted Dr. Google, but alas! No one has designed a tool for your specific need yet.
Not to worry, I’ve got you covered. The first step: understand scripting.
Introduction to the Scripting Workspace in Blender
Blender uses Python to give scripting access to a lot (but not all) of its functionality. If you’ve never used Python, I recommend checking out the W3 Schools Python Tutorial. It is completely free, and they’ll give you a quick rundown of the language’s features and syntax.
I had never touched Python before using Blender, but I have used a lot of VBA and Javascript. I was able to pick up the Python syntax pretty quickly.
Where to Write Scripts in Blender
So we need to write some Python code. Awesome… but where do we do it? Turns out, Blender’s got you covered again!
If you’ve never noticed the Scripting workspace before, we’re going to dive in.
Open the Scripting Workspace
Click the “Scripting” tab in the Top Bar.
You get a 3D Viewport in the top left, a Python console beneath that, and an Info window at the bottom. In the middle, you see the Text Editor. On the right, you have the Outliner and Properties.
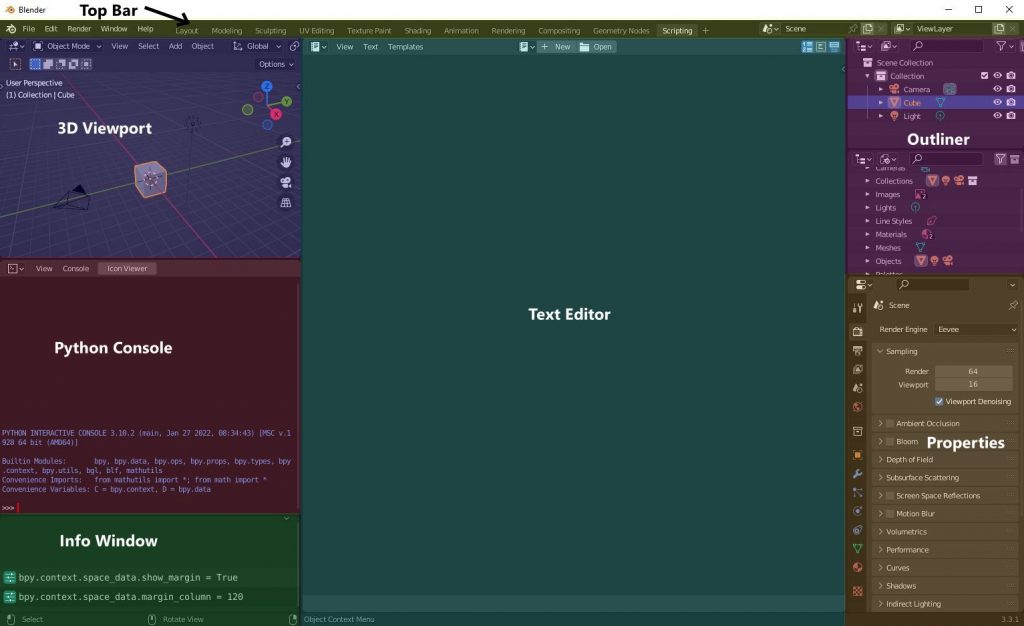
Create a New Text File
Clicking in the Text Editor right now does nothing. You must create or open a text file first. You can do this by:
- Press “+ New” to create an empty file
- Press “Open” to select an existing file
- Press “Templates -> Python” to select one of Blender’s prebuilt example templates
Once a file is open, take a look at the top right side of the Text Editor. Click that arrow and you get two useful menus. The first is a Find & Replace tool that works like any other you have probably used. The second is Properties.

Properties has a couple of useful tools for us. In my opinion, the best one here is font size. Especially on a higher resolution monitor like my 1440p Gigabyte, the default 12-point tiny font hurts my eyes. I can’t even imagine what that would feel like on a 4K screen. You can change the font here, or hover your mouse cursor in the Text Editor while holding “Ctrl” and use the mouse scroll wheel to change the font size.
Click the box next to Margin to turn on a guide line overlayed on the Text Editor. The default is 80 characters wide, but I like to set it to 120 to keep with the Blender developers’ style guide for contributed scripts. This margin does not automatically wrap the code when the line gets too long (although there is an option for that under View -> Word Wrap). It just indicates where the margin line falls so you know when your code reaches illegibility length.
If you want to get this script published with Blender, you must pay attention to that margin as well as the other points in the style guide. Additionally, they require 4 spaces for indentation instead of tabs, so leave the defaults on the Indentation dropdown on “Spaces” and keep Tab Width set to 4.
How do I create my own Add-on?
Now that we know where to get started with scripting, it’s time to create our script. Scripting add-ons in Blender has proven to be a regular labyrinth of complexity, so like any great learning journey, we need to start small.
How Add-ons Are Packaged
Let us examine how add-ons get packaged for distribution.
Developers confine their simplest add-ons to an individual Python file. That’s what we’re going to do in this tutorial. But, if your script gets large and complex, you can use some software development best practices and encapsulate your code into other Python files. You then bundle all these files together into a .zip archive.
Create the Script’s Meta Info
Like providing a passport to customs, our Python module needs to provide some meta info before Blender accepts it into the Add-on menu to present for use. We do that with a Python dictionary named bl_info at the top of the script. Here’s an example:
bl_info = {
     "name": "Hello 3D World!",
     "description": "Say hello world... in 3D!",
     "author": "M. Scott Lassiter",
     "version": (1, 0, 0),
     "blender": (3, 3, 0),
     "location": "Properties",
     "warning": "Don't forget to delete the default cube!",
     "doc_url": "www.GraphicArtQuest.com",
     "tracker_url": "www.GraphicArtQuest.com/bug_reports",
     "support": "COMMUNITY",
     "category": "Mesh"
}
Go to Text -> Save As and save the file as Hello3DWorld.py.
Install the Add-on
Back in the add-ons menu, click “Install…”. Navigate to the folder you just saved Hello3DWorld.py in, select the file, and click “Install Add-on”.
Now when you search for your add-on, it appears amongst the others.
The information from your meta data will show up in the Add-ons panel in Blender Preferences. Our example looks like this:
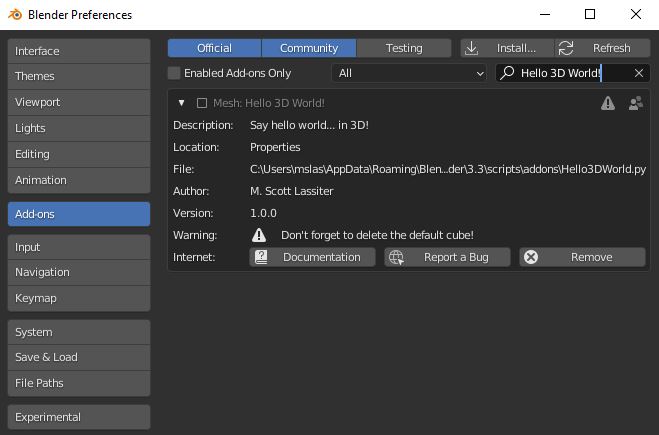
Blender’s Script Meta Info documentation will tell you specific information about what each of these does, but here are a couple of the non-obvious highlights:
- “version” should follow the Semantic Versioning scheme, but you can use any number of integers you want in the tuple. e.g. (1), (1, 3), and (1, 2, 3, 4, 5, 6) are all valid.
- “blender” also follows Semantic Versioning, but must contain exactly three digits. This indicates which Blender version or later the add-on needs to run. In 2020, the Blender team switched to Semantic versioning starting with version 3.0. This field helps Blender understand if it should even show your add-on to a user still operating with a lower version number.
- “location”: A string that tells the end user where this functionality is located. This can be anything you want as it has zero bearing on where your code appears (that involves further code we will discuss below), although I do recommend following similar patterns as other add-ons for consistency.
- “support” must be “OFFICIAL”, “COMMUNITY”, or “TESTING”. You should use “COMMUNITY” (which it defaults to if you omit this field). Once you commit your add-on to a Blender release, you can change this to “OFFICIAL”.
- “doc_url” links the Documentation button to a website of your choosing.
- “tracker_url” links the Report a Bug button to a website, also of your choosing.
- “category” helps group your add-on with other similar functionality. You can make this any string your little heart desires, although the official documentation provides a list of the official (case-sensitive) categories.
Activate the Add-on
Go ahead and click that check box to activate your add-on.

Alas! You’re immediately greeted with an error that tells us our add-on has no attribute ‘register’.
What the font does that mean?
We defined the meta data, but it turns out Blender requires us to include some other boilerplate functionality before we have ourselves a fully-fledged add-on.
Create a Register Function
Blender looks for a function called “register” that it runs once a user clicks the enable checkbox in the add-ons menu. If it doesn’t have this function, your add-on doesn’t work. Create it by adding this below your bl_info definition:
def register():
    print("Hello 3D World!")
Create an Unregister Function
Blender also requires another function (that it hasn’t had a chance to yell at us about yet) called “unregister” which runs when a user disables the add-on. Create this function by adding this code below the register function:
def unregister():
    print("Goodbye 3D World!")
Trying to enable our add-on still causes the error though. That’s because Blender loaded a copy of the script, it does not run it from the file location. We must remove the add-on and reinstall it. Once you do that, click the box to activate it.
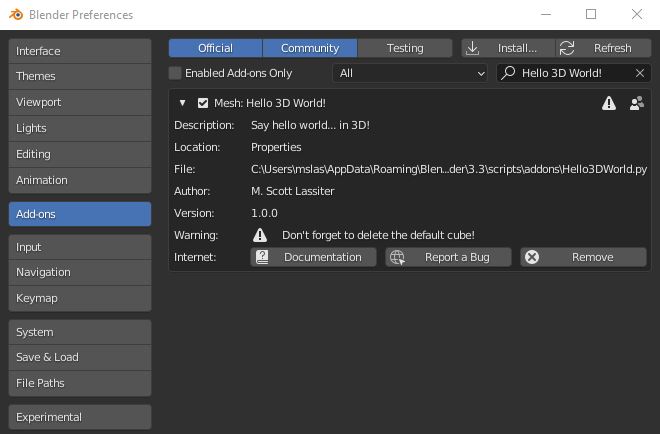
Huzzah! No errors!
But where did our Hello 3D World print to?
How to View the Python Console Output
Turns out, it’s not going to Blender’s console, but the system console. Go to Window -> Toggle System Console.

There’s your output! Congratulations, you have just created the most basic boilerplate example of an add-on imaginable.
Let’s create some real functionality now.
Use the Info Window to Find API Commands
If you’ve ever used Excel VBA, you know the magic of the Macro Recorder. You start recording, and you can see the output of every action you take while manipulating a spreadsheet so you can repeat the process using VBA code. Blender has something similar.
Remember that Info Window in the bottom left of the Scripting workspace? It logs significant events, and you can use this to get an idea of what the Python script looks like.
Go ahead and delete the default cube. You’ll see Info output:
Deleted 1 object(s)
Now, in the 3D Viewport, go to Add -> Text. Info outputs:
bpy.ops.object.text_add(enter_editmode=False, align='WORLD', location=(0, 0, 0), scale=(1, 1, 1))
Well, that’s interesting, isn’t it?
Use bpy to Access the API
Blender has a Python module called bpy that gives us the API to interact with it. Beneath your bl_info definition, add:
import bpy
Now, we can modify the register function like this:
def register():
    print("Hello 3D World!")
    bpy.ops.object.text_add(enter_editmode=False, align='WORLD', location=(0, 0, 0), scale=(1, 1, 1))
If you reinstall and activate now, nothing will happen because Blender threw a run time error:
AttributeError: ‘_RestrictContext’ object has no attribute ‘view_layer’
Blimey. Stopped again! Blender threw this error because it tried to run an operator to add a text object to the 3D Viewport, but the 3D Viewport didn’t have what Blender calls the current context. Essentially, what has focus at the moment? The Blender Preferences window does. You can’t add an object to that window, so it threw the error.
That seems easy enough to address. We need to get a valid context to work with. Let’s do that while simultaneously making this add-on easier to use.
How to Register a Panel
We want to make our script run from a button, but that button needs a place to live. We will create that place by extending an existing Blender class, bpy.types.Panel. Add this code beneath import bpy:
class CustomPanel(bpy.types.Panel):
    bl_label = "Hello 3D World"
    bl_idname = "OBJECT_PT_HelloPanel"
    bl_space_type = 'PROPERTIES'
    bl_region_type = 'WINDOW'
    def draw(self, context):
        layout = self.layout
What’s going on here?
- bl_label: The panel’s label text for the end user.
- bl_idname: A unique identifying name for this panel. Blender has some strict naming conventions on this. That _PT_ has to be there. If not, Blender at you in the console:
Warning: 'OBJECT_HelloPanel' does not contain '_PT_' with prefix and suffix
Despite that, everything seems like it still runs. Best to not argue this one though.
- bl_space_type and bl_region_type dictate where the panel appears. More on that in another post.
- The draw function controls the panel organization and layout
To tell Blender how to use this panel, update the register and unregister functions like this:
def register():
    bpy.utils.register_class(CustomPanel)
    print("Hello 3D World!")

def unregister():
    bpy.utils.unregister_class(CustomPanel)
    print("Goodbye 3D World!")
If you reinstall your add-on, you will now see the panel in the Properties area.
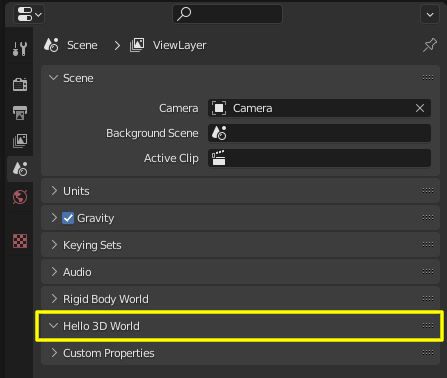
Not very interesting yet, but we’re getting there!
How to Add the Button
Beneath your CustomPanel class, add another extended class:
class ButtonOperator(bpy.types.Operator):
    bl_space_type = 'VIEW_3D'
    bl_region_type = 'TOOL_PROPS'
    bl_idname = "sayhello.addtext"
    bl_label = "Say Hello!"
    bl_category = "Tools"
These properties work the same as before, except for bl_idname. This one can be any string value you want as long as it has at least one period in it. Take out the last half of that, and you get another Blender screaming fit:
RuntimeError: Error: Registering operator class: 'ButtonOperator', invalid bl_idname 'sayhello', must contain 1 '.' character
Why? It has to do with organizing namespaces within Blender, but otherwise, it carries little consequence for Python scripters. So just include the ‘.’ like they ask. It will help you later as you flesh out your add-ons.
As before, we need to update the registration functions:
def register():
    bpy.utils.register_class(CustomPanel)
    bpy.utils.register_class(ButtonOperator)
    print("Hello 3D World!")

def unregister():
    bpy.utils.unregister_class(CustomPanel)
    bpy.utils.unregister_class(ButtonOperator)
    print("Goodbye 3D World!")
Before we reinstall the add-on, update the CustomPanel class draw function to show the button:
class CustomPanel(bpy.types.Panel):
    bl_label = "Hello 3D World"
    bl_idname = "OBJECT_PT_HelloPanel"
    bl_space_type = 'PROPERTIES'
    bl_region_type = 'WINDOW'

    def draw(self, context):
        layout = self.layout
        obj = context.object
        row = layout.row()
        row.operator(ButtonOperator.bl_idname, text="Hello There")
Now we get this:
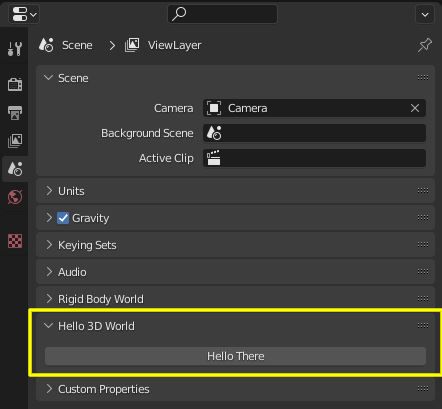
Nothing will happen if you click the button, but we put the framework in place. Now for the functionality.
Make the Button Add a Text Object
The Blender operator class has an execute function you use to do your bidding when we call the operator using the button. Update your ButtonOperator class like this:
class ButtonOperator(bpy.types.Operator):
    bl_space_type = 'VIEW_3D'
    bl_region_type = 'TOOL_PROPS'
    bl_idname = "sayhello.addtext"
    bl_label = "Say Hello!"
    bl_category = "Tools"

    def execute(self, context):

        bpy.ops.object.text_add(enter_editmode=False, align='WORLD', location=(0, 0, 0), scale=(1, 1, 1))

        txt = bpy.context.active_object

        txt.data.body = 'Hello 3D World!'
        txt.modifiers.new('Make it chonky', 'SOLIDIFY')
        txt.modifiers.get('Make it chonky').thickness = -0.25

        return {'FINISHED'}
This code uses bpy.ops.object.text_add to add a default Text object to the 3D scene. For a reason I have not identified yet, Blender doesn’t return that object to us in a useful way. I could refer to it as bpy.ops.object[“Text”], but if I already had an object named that then this wouldn’t work.
We can solve that problem by taking advantage of Blender setting the newly created object as the active one. Once we grab that in our txt variable, we can set the wording to whatever we want using txt.data.body.
This isn’t any old hello world tutorial though, this is a 3D hello world tutorial. Add a solidify modifier on to that (with an appropriate name, of course), and set the thickness value.
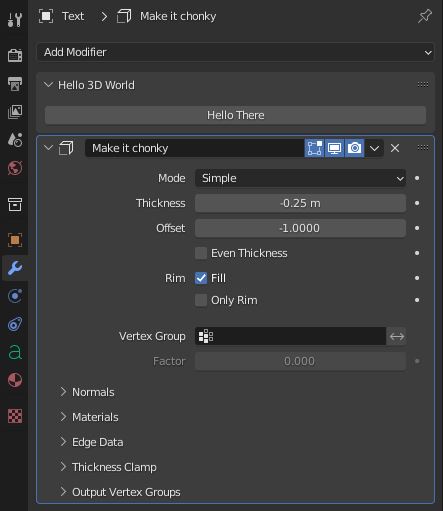
You can name the modifiers anything, but if you leave it up to the defaults you will have a harder time referring to it again with your Python code for the same reason as the text object.
Finally, we return ‘FINISHED’ to make Blender happy.
Watch the Add-on In Action
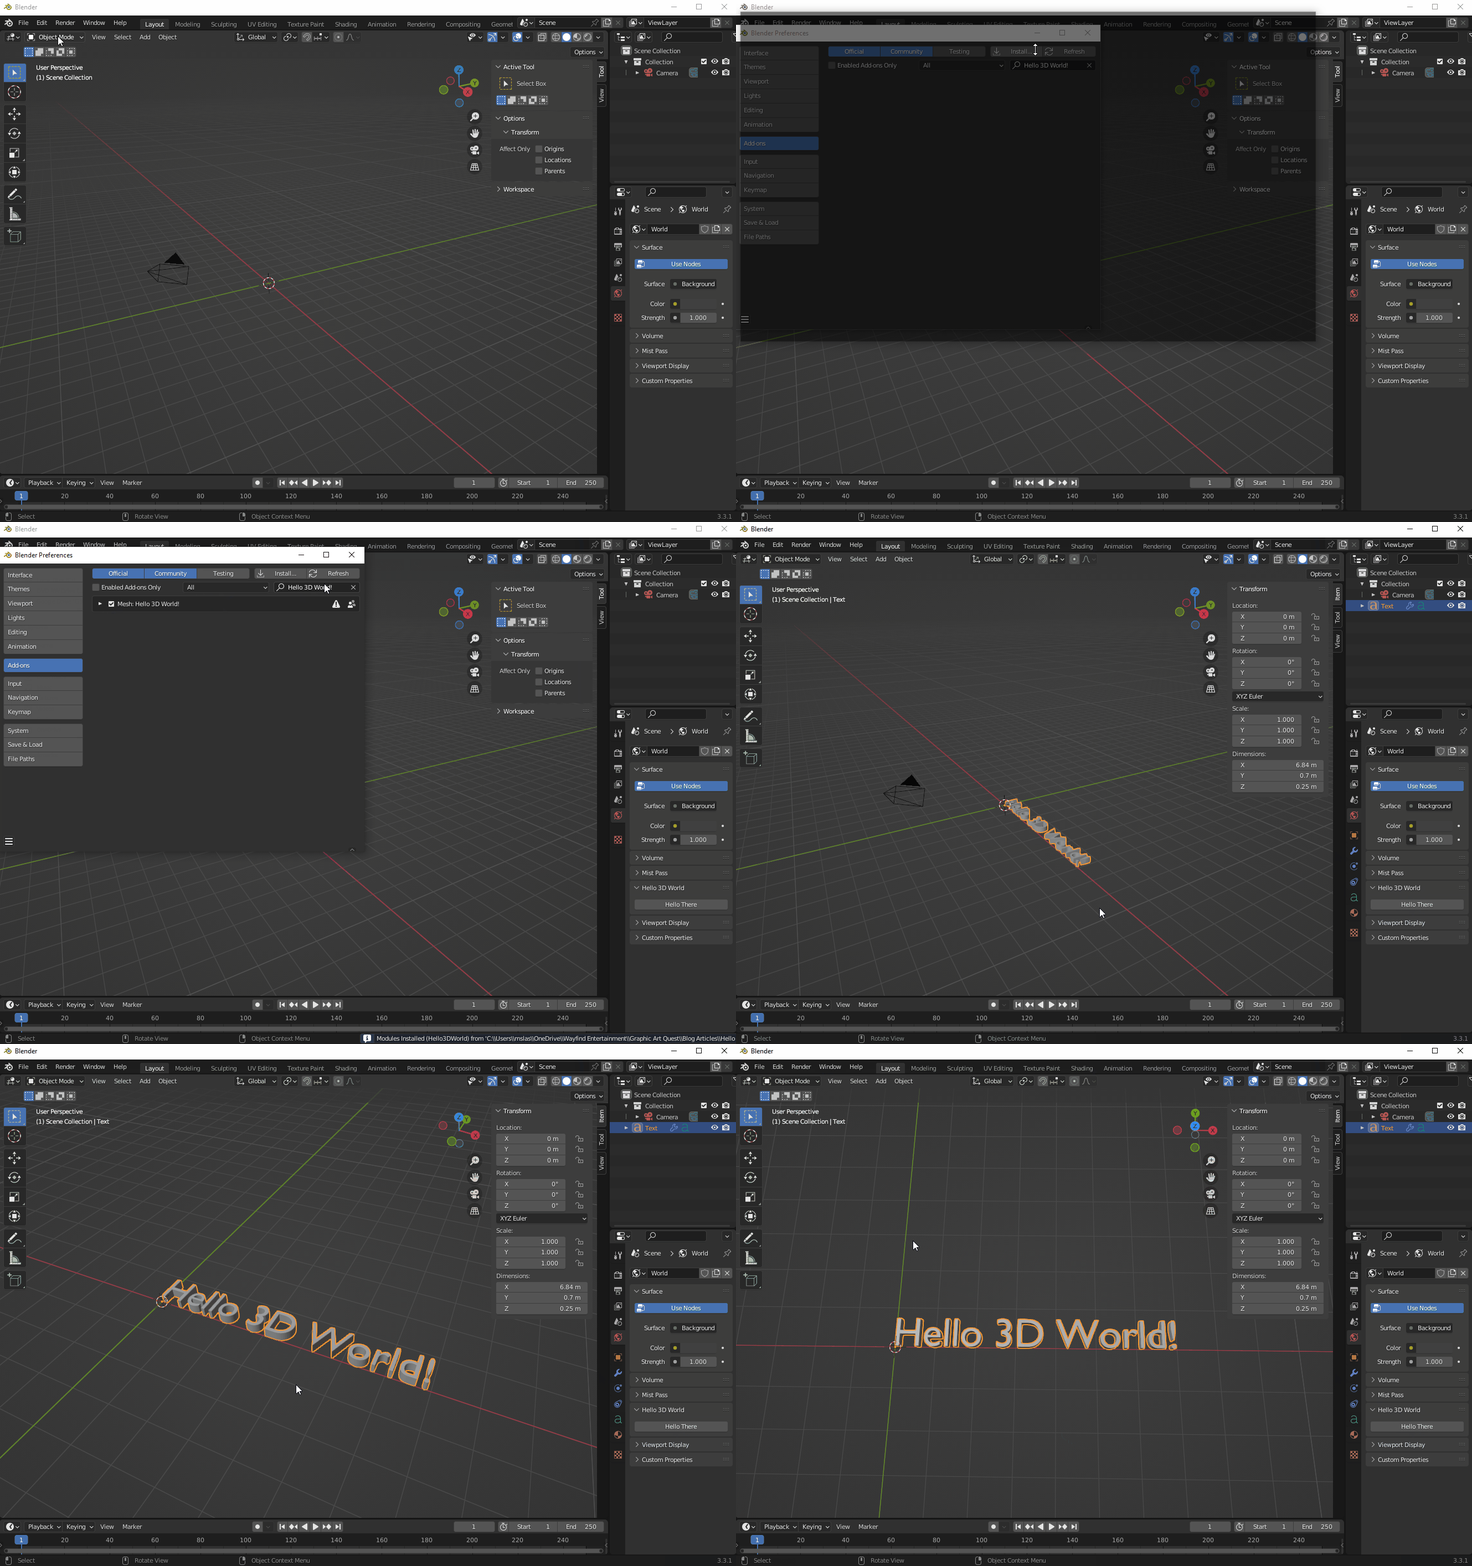
Reinstall the add-on, and then click the button to see your hard work pay off in all its 3D glory.
Nice.
What Next?
For your convenience, I uploaded all of this code to GitHub. Don’t forget to subscribe to the YouTube channel for more videos.
If you found this article helpful, come back and leave a note in the comments about what you made!



Comments 1